
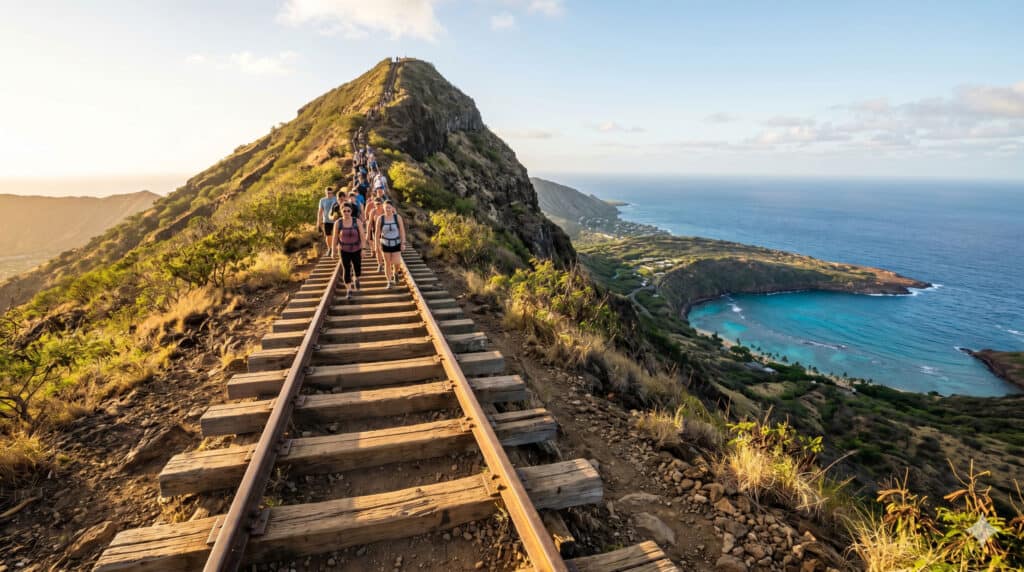
Some hikes earn their reputation through scenery alone. The Koko Head hike earns it through sheer effort — 1,048 stairs of relentless, sun-baked railway ties — and then pays you back at the summit with one of the most jaw-dropping views on Oʻahu. Short, steep, free, and less than 30 minutes from Waikiki: this is the kind of morning that makes a vacation feel like an adventure.
The Koko Crater Railway Trail is one of the most-discussed hikes in Hawaii, and for good reason. This guide covers everything: trail stats, directions, parking, how hard it actually is, what changed after the 2025 safety incident, what to pack, when to go, and the best nearby stops to turn a morning hike into a proper East Oʻahu day.
Koko Head Hike at a Glance
Before you lace up, here’s the fast version of what you’re getting into:
- Trail name: Koko Crater Railway Trail (also called the Koko Head Stairs or Koko Head Tramway)
- Distance: Just under 2 miles round trip
- Stairs: 1,048 railway tie “steps”
- Elevation gain: ~990 feet (summit at approximately 1,208 feet)
- Typical time: 30–90 minutes total, depending on fitness and breaks
- Difficulty: Short, steep, and fully exposed to the sun — expect real leg burn
- Cost: Free. No reservation or permit required.
- Parking lot hours: 4:00 a.m. – 11:00 p.m.
- Dogs: Allowed on leash
For a side-by-side comparison of Oʻahu’s best hike options, our guide to the best day trip hikes from Waikiki stacks Koko Head up against Diamond Head, Makapuʻu, and several others worth knowing about.
Getting There from Waikiki: Directions and Parking
Koko Head sits in the Hawaiʻi Kai neighborhood on the southeast side of Oʻahu — about a 20–30 minute drive from Waikiki under normal traffic. It’s far enough to feel like a real excursion, close enough to be done before noon and still hit the beach afterward.
For GPS, plug in: 423 Kaumakani St, Honolulu, HI 96825. Google Maps and Waze both handle “Koko Head Trailhead Parking Lot” well too. One heads-up: Hwy 72 occasionally has brief closures near the park entrance. If that happens, the alternate route winds through the residential area via Lunalilo Home Rd to Anapalau St.
A few parking specifics worth knowing before you go:
- The lot opens at 4:00 a.m. — which is exactly what sunrise hikers need to time the summit right
- If you arrive before 4:00 a.m., street parking near the tennis courts is the standard move
- There are two lots inside the park. The first, closer to the tennis courts, has public restrooms — use them before you start, since there are no facilities on the trail or at the summit
- The second lot is larger and sits slightly closer to the trailhead
- Parking is free
Don’t leave valuables visible in your car. Standard advice across Oʻahu trailheads, but worth the reminder here.
How Hard Is the Koko Head Hike, Really?
Harder than it looks on paper. The mileage is nothing — under a mile going up — but the stairs go relentlessly upward with almost no flat stretches, and there’s zero shade from trailhead to summit. If you’ve done the Diamond Head hike, think of Koko Head as a different tier: steeper, more exposed, and no tunnel or platform breaks along the way. Still very doable for healthy adults who pace themselves and drink water. Just don’t let anyone else’s speed set yours — some locals run this thing multiple times before breakfast.
Here’s a realistic breakdown of what to expect:
- Fit hikers moving steadily: 20–40 minutes to the top
- Most visitors, with breaks and photos: 45–75 minutes up
- Downhill: Often harder than expected — the ties are uneven, spacing varies, and your knees take a real beating on the descent. Take your time.
- The final 100 steps: Widely agreed to be the toughest stretch right before the summit. You’ll know it when you hit it.
One section deserves a heads-up: roughly halfway up, the trail crosses a short trestle bridge with open space beneath the ties. It’s about 50 steps and not dangerous, but it can feel exposed if heights bother you. There’s a bypass trail to the right through a shaded clearing — completely normal to take it, and plenty of hikers do.
A quick bit of history: the stairs are original railway ties from a WWII-era U.S. military tram that transported supplies up to a radar station at the summit. The military handed the site over to the City and County of Honolulu in 1966, and hikers have been climbing it ever since. The nonprofit Kokonut Koalition maintains the steps today — donations are welcome if you want to support the trail.
Trail Safety in 2026: What Changed After the Bunker Incident
In July 2025, the trail made news when an 8-year-old boy fell 20–40 feet into a shaft at one of the old military bunkers at the summit, sustaining critical injuries. The trail closed briefly while the City assessed the situation, then reopened July 10, 2025, after workers placed caution tape and barriers around three bunker access points.
By late 2025, the City followed through with a more permanent fix — sealing the bunker openings with metal bars to prevent entry. As of 2026, the trail is fully open. A few things still matter:
- Stay on the tramway. Don’t venture off-trail or past any posted warning signs or barriers.
- Keep children close at the summit. The sealed bunkers are clearly marked, but stay away from the structures.
- Check for closure notices before you go. The City can temporarily close the trail for maintenance with short notice. The Honolulu Department of Parks and Recreation is the best place to check current status.
- Take the descent seriously. Most slips happen on the way down. Keep space between you and other hikers, especially on dusty or uneven sections.
Heat exhaustion is also a real concern on this trail. Dizziness, nausea, heavy sweating, and feeling “off” are all signs to stop and turn around. No summit view is worth pushing through those signals.
What to Bring — and When to Go
This is a short hike, but it’s exposed and physically demanding. Packing smart makes the difference between a great morning and a miserable one.
Must-haves:
- Water — more than you think. At least a full liter per person; more in summer or if you’re going midday
- Sturdy shoes with grip. Trail runners or light hiking shoes work well. Flip-flops are technically possible and consistently regretted.
- Sunscreen, a hat, and sunglasses — the sun hits you from the trailhead to the summit the entire way
- A small daypack to keep your hands free on the ties
- A headlamp or phone flashlight if you’re hiking before dawn
Nice to have:
- Electrolyte tablets or packets if you sweat heavily
- A light snack for the summit — you’ll have earned it
- Blister pads or basic first-aid supplies
For a full Waikiki packing breakdown — hiking gear, beach days, and everything in between — our Waikiki packing guide has the complete list.
When to go: Early morning, and it’s not close. Sunrise at Koko Head is one of the best free experiences on Oʻahu — cooler temperatures, smaller crowds, and golden light spilling over Hanauma Bay below you. The lot opens at 4:00 a.m. for exactly this reason. If you bring a headlamp, you can be on trail before first light and hit the summit right around sunrise. If that alarm isn’t happening, get there as early as you can manage. Midday heat on a fully exposed staircase is a very different hike than an early morning one.
After the Hike: East Oʻahu Is Worth Staying For
You’re already in one of the most scenic corners of the island. It makes no sense to drive straight back to Waikiki. These stops pair naturally with a Koko Head morning:
Hanauma Bay — You literally saw it from the summit. Now go snorkel it. The preserve is only open Wednesday through Sunday, has a limited daily entry cap, and requires advance reservations that fill up fast. Our Hanauma Bay reservation guide has the booking strategy that actually gets you in. Hike Koko Head first — you’ll want the cooler morning temps — then head to the bay afterward.
Halona Blowhole — Five minutes down Hwy 72. Sea spray shoots through a lava tube with real force, and the sea cliffs here are dramatic. Free, and worth 15 minutes of your time.
Sandy Beach Park — One of Oʻahu’s most famous shorebreak spots. The waves are spectacular to watch; swimming is a separate judgment call depending on current conditions and your experience level.
Makapuʻu Lighthouse Trail — A paved, ADA-accessible trail with sweeping windward coast views and a much gentler grade. After Koko Head, your knees will thank you.
Koko Crater Botanical Garden — Inside the crater itself. Known for its dramatic cacti and succulent collection, this is a surprisingly photogenic detour that requires zero stair-climbing. Worth it even if you’re a little wiped out from the hike.
For a broader look at East Oʻahu and beyond, our list of the 20 best day trips from Waikiki covers the full southeast coast and a lot more.
A Simple Half-Day Plan from Waikiki
- 5:30–6:00 a.m. — Leave Waikiki (earlier if you’re targeting the summit at sunrise)
- 6:00–6:30 a.m. — Arrive at 423 Kaumakani St., park, use the restroom, start climbing
- 7:00–8:00 a.m. — Summit: views, photos, snack, catch your breath
- 8:00–8:45 a.m. — Careful descent (take it slow on the ties)
- 9:00 a.m. — Choose a bonus stop: Halona Blowhole, Sandy Beach, or the Botanical Garden
- Late morning — Back to Waikiki for a well-earned breakfast and beach time
Want to build this into a full trip? Our 5-day Waikiki itinerary shows exactly how to weave East Oʻahu adventures into a balanced vacation schedule without feeling rushed.
Frequently Asked Questions About the Koko Head Hike
Is the Koko Head hike open right now?
Yes. As of 2026, the Koko Crater Railway Trail is fully open and operating normally. The trail was briefly closed in July 2025 following a safety incident at the summit bunkers. The City placed caution tape and barriers immediately, then sealed the bunker access points with metal bars by late 2025. The trail is open 24/7, though the parking lot closes at 11:00 p.m. Check the Honolulu Department of Parks and Recreation for any short-term closures before you go.
How hard is the Koko Head hike for beginners?
Challenging, but completable for most healthy adults. The mileage is short, but the constant steepness and full sun make it harder than it looks. If you can manage a long flight of stairs at home without stopping, and you’re willing to take breaks and drink water consistently, you can do this hike. Start early, go at your own pace, and don’t measure yourself against anyone else on the trail.
Do I need a reservation or permit to hike Koko Head?
No. The Koko Crater Railway Trail is free and requires no reservation or permit — which makes it far more accessible than nearby Diamond Head, which requires advance reservations for non-residents. Just show up. Parking is also free.
What is the best time of day to hike Koko Head?
Early morning is the clear winner — aim to be on trail by 6:00 a.m. or earlier. The parking lot opens at 4:00 a.m. for a reason. The trail has almost no shade, and midday heat turns an already challenging hike into a genuinely unpleasant one. Sunrise hikers also get smaller crowds, cooler air, and the kind of golden coastal light over Hanauma Bay that makes the summit feel even more worth it.
How far is Koko Head from Waikiki?
About 20–30 minutes by car depending on traffic. Koko Head is located in Hawaiʻi Kai on the southeast side of Oʻahu. There’s no direct bus route that gets you close to the trailhead, so a rental car, rideshare, or organized tour is your best option if you don’t have your own wheels.
Can I combine Koko Head with a visit to Hanauma Bay?
Absolutely — this is one of the best East Oʻahu half-day combinations you can put together. Hike Koko Head first in the cooler morning, then head to Hanauma Bay for snorkeling. Just remember: Hanauma Bay is only open Wednesday through Sunday, requires advance reservations, and has a limited daily entry cap. Check the reservation guide to plan the timing correctly so you don’t arrive without a spot.
The Koko Head hike is one of those things that sounds straightforward until you’re 600 steps up with your legs burning, the Pacific spread out below you, and the summit still a ways off. It’s hard. It’s stunning. And for most visitors, it ends up being one of the best things they did on the entire trip. Go early, bring more water than you think you need, and take the bypass if the trestle bridge bothers you. The view at the top is exactly as good as everyone says it is.